Showing posts with label Unit 30 - Camera and Lighting Techniques. Show all posts

Thursday, November 14, 2019

Contextual Studies - American new wave film

EVALUATION -


The overall film doesn't scream new wave however taking inspiration from pulp fiction I wanted the audience to follow a story in chapters however the overall story doesn't have a strong narrative due to the time limit.
In this video the aim was to show a new wave film within 2 minutes. I chose to base my film around a normal day for myself when I am not at college or work, the reason for this was the fact that I had access to locations I could film easily in, I also based my video around a specific moment from pulp fiction, the car scene, with the unscripted dialogue and the long takes and jump cuts seen in new wave film.
Overall I'm not very pleased with my Film I believe the footage I shot could have been better and the narrative structure could have been better, as well as having more examples of typical new wave ideologies and techniques.

Thursday, October 31, 2019

Practical Skills - Health and safety, when on set.

Health and Safety

Professional film crews take health and safety issues very seriously. The line of responsibility runs from the Producer to the Production Manager and 1st Assistant Director and finally on to all crew members who have a duty of care which is recognised by law. If someone can see the potential for an accident and does nothing to try to prevent it, they can be held responsible in some way, probably along with their senior colleagues.


When filming, people have many things on their minds, things can get rushed, and risks can increase. Even simple things can become dangerous because this is not an ordinary situation. Of course, all of life presents hazards, but if someone is asked to run down a hill repeatedly to get the scene right, for example, the risk of them tripping and falling on their face is increased with each time they do this. If the hill is pavement rather than grass the risk of serious injury is increased.

Risk assessment

The way to stay safe is to look at each shooting set up or location individually and think of what exactly could go wrong. This is called a risk assessment.

It's a three step process
  • Identify all the hazards 
  • Evaluate the risks 
  • Identify measures to control the risks 
Then put in place safeguards to eliminate or minimise risk. You should make a record of any risk assessment to ensure the students are clear on how to stay safe. This can save time during your shoot. Rules about listening to each other, respecting a chain of command, looking after equipment properly, and not rushing, will all help to keep people safe and happy.


'Hazard' refers to the potential for harm. while 'Risk' is the chance of that harm actually happening. Though some hazards might seem very obvious, people might still need to have them pointed out.

Weather

Extremes of weather are one commonly overlooked hazard. If you are filming outside all day, it is essential to make sure the crew are dressed appropriately. A lot of the time you may be standing around and people will get cold very quickly even in what seems quite mild weather. Layers of clothes are best, and get everyone to bring a waterproof and a woolly hat - they keep out wind as well as rain and are invaluable.
Sunburn and heatstroke are other outdoor hazards. Always have high protection sunscreen on hand and make the students put it on. Try to get students to wear some kind of sun hat or stay in the shade when possible and make sure lots of water is available to drink. The other reason for sunscreen is to stop the actors' appearance changing drastically and messing up the continuity of the film!

Time pressure

Rushing to finish in time is when hazards get missed, or people start taking risks. If this starts to happen, take a moment to calm everyone down and remind them: this is only a film. If you feel really pressured try to think of how to lighten the work-load: can you cut out some shots or set ups to give you the time to get the most essential stuff for the film without a panic? Or can you come back tomorrow to finish?

Other common hazards

Tripping hazards

Move or gaffa tape down cables and objects that could be tripped over.

Lifting hazards

Go carefully when moving or lifting heavy or dangerous things, ask someone to help you.

Camera risks

When a camera operator or cast member is walking during a shot, make sure they are comfortable with their route and there is nothing that could cause problems (a camera operator who needs to walk backwards for a shot should have an assistant to guide them and/or check their route).

Water
Shots that involve water.

Precarious


Shots from high up or near the edge of something.


Shots that look illegal
Shots might look illegal if you didn't know a camera was there. This could cause distress to members of the public &/or cause a police call out.


Bibliography -
Moving image education, Health and Safety. Available at: https://movingimageeducation.org/create-films/production/the-production-department/health-and-safety (accessed 31st October 2019)

Images -
Safety first - available at: https://www.direct365.co.uk/blog/health-and-safety-signs/ (accessed 31st October 2019)
Time - Available at: https://nationalpost.com/entertainment/books/how-the-world-became-obsessed-with-time-and-efficiency (accessed 31st October 2019)
Weather - available at: https://www.wired.co.uk/article/long-range-weather-forecast-uk (accessed 31st October 2019)

Tuesday, October 29, 2019

4 hour film challenge - unusual perspective

We were tasked with making a short film exploring a different perspective of what would normally be seen, in knowing this I based my film around a persons day to day life of going and sitting at a bench,  when shooting this I decided to follow the protagonist throughout the film using different angles and distances that could be considered unique for this sort of movement, such as extremely long shots from a weird angle or close up shots of the protagonists feet while walking. In editing this short film I learned how to create "bins" in premiere pro and learnt the importance of renaming and organising clips as it makes the editing process a lot simpler, especially if you are coming back and continuing with the edit at a later date, helping you know what shots are what and whether the clip is particularly useful or not.

4 hour film challenge 1920's


Monday, October 21, 2019

Contextual Studies - American new wave short film task

Brief - 

I am tasked with investigating a New Wave of my choice from a recognised era,  critically assessing the key factors surrounding a range of films and assessing the impact of their reception, alongside that I am tasked with creating a short film that is around 2 minuets long, demonstrating the techniques of the new wave I have been assessing, I have chosen American New Wave as my area of study for this assignment.


Planning - 

  • Car scene, 
  • Pub scene.      all of theses because of ease of accesses the weekend I will be filming will be at 
  • Skating.          the last 2 locations and a friend has agreed to use his car.

  • Long shots and jump cuts prominent in filming, due to the use of them in new wave film.
  • Lack of script due to the objection of the conventions of classical cinema

Techniques of new wave

focus on crime and drugs
real conversations non scripted
jump cuts
punchy dialogue
mistakes
long takes
inspiration - the godfather and pulp fiction
In particular the car scenes


Narrative

my narrative changed over time, originally I was going to do a short clip about 2 guys buying drugs from a crime lord, however now realising the complications of such, with a limited time to film, I changed my idea to a simple 2 minute video of my weekend, done In the style of American New Wave Film.

Test Footage - 


This is some of the test footage I took, using a tripod and camera and adapting the iso settings to get some footage that looks natural, the dialogue in the videos is non scripted and is natural conversation between the subjects of the film,  the shots are a mix of mid and long shots focusing on a subject, and they are all long takes, in editing I will add them together including jump cuts and non diegetic sound in some places to add to the stylism of American New Wave.

Bibliography:
Pulp Fiction scene. Available at: https://youtu.be/LBBni_-tMNs (accessed 7 NOVEMBER 2019)

Thursday, October 17, 2019

4 hour film challange - illusions


Given the brief of using jump cuts to create illusions, we chose to edit to a soundtrack of the popular Wii theme tune as it was easy to define the beats in which to do the cuts to, creating the illusion of people appearing and disappearing to the tune. For this we had a camera setup in the corner of the room facing to the other corner so the front of the room wasn't in shot allowing for a free space to use for holding props and keeping the actors out of shot, as well as making it safer to shoot stopping people from tripping over the tripod legs. the only health and safety risk we came across was when stacking things on tables like rolling chairs etc, but that was overcome by making sure we marked out where we were putting things. I feel like I could improve the video by adding more jump cuts to the beat when there are longer durations between cuts to stop the video from looking weird, however after getting feedback from the clip I was told that it made audience members laugh, showing that I got engagement from the audience and when doing a group critical analysis of the clip we agreed it was creative, we had Thought of sound first for ease of editing we used a tripod to make sure the camera didn’t move so we had a stable image however it was slightly out of focus, wasn’t the best footage, due to the exporting process so maybe we needed to use a different clip type.

Monday, October 7, 2019

Camera and Lighting - Lighting research and experiments

Rembrandt
- is a lighting technique that is used in studio portrait photography. It can be achieved using one light and a reflector, or two lights, and is popular because it is capable of producing images which appear both natural and compelling with a minimum of equipment. Rembrandt lighting is characterized by an illuminated triangle under the eye of the subject on the less illuminated side of the face. It is named for the Dutch painter Rembrandt, who often used this type of lighting. like the use of split lighting it can be used to create a softer chiaroscuro effect making the subject look mysterious.


Edge
- Split lighting is a technique that produces a sense of drama to a scene. This form of lighting is when half of the subject's face is lit, while the other half is left dark. The light is evenly divided over the subject. this creates an effect that in cinema is referred to as chiariscuro with makes the subject seem mysterious and evil and is usually used to show that a character has a duel personality, its very common in film noir.


Butterfly 
- Butterfly lighting is a portrait lighting pattern where the key light is placed above and directly centered with a subject's face. This creates a shadow under the nose that resembles a butterfly. It's also known as 'Paramount lighting,' named for classic Hollywood glamour photography.


other lighting techniques I found by searching around on google looking at different ways to use lighting techniques used with portrait photography, and how I can apply them to the moving image to generate a specific mood or feel to a scene or to create a New wave style technique.


experimental lighting,

Using a silver reflector and the light to the right hand of the subject with the camera facing straight on I created several different moods and feels, using a mixture of coloured filters over the led lights and also by changing the iso settings ion the camera and by using the reflector to either angle light back at the subject or to block out light completely, here are some still images and some clips to show what I did.


Bibliography:
Butterfly Lighting - https://www.slrlounge.com/glossary/butterfly-lighting-definition/ (accessed 7 October 2019) 
Edge lighting - http://blog.backdropexpress.com/lighting-series-profile-and-split-lighting/ (accessed 7 October 2019)
Rembrandt lighting - https://en.wikipedia.org/wiki/Rembrandt_lighting (accessed 7 October 2019)

Images - 
Butterfly 
- https://www.dpmag.com/how-to/shooting/classic-portrait-light-2/ (accessed 7 October 2019)
- https://photo.stackexchange.com/questions/6772/what-is-butterfly-lighting-and-when-do-i-use-it (accessed 7 October 2019)
Edge lighting 
- https://clickitupanotch.com/split-lighting-made-easy-with-5-steps/ (accessed 7 October 2019)
- https://photo.stackexchange.com/questions/6656/what-is-split-portrait-lighting (accessed 7 October 2019)
Lighting guide 
- https://www.digitalcameraworld.com/tutorials/cheat-sheet-pro-portrait-lighting-setups (accessed 7 October 2019)
Rembrandt lighting
- https://expertphotography.com/rembrandt-lighting-photography/ (accessed 7 October 2019)
- https://en.wikipedia.org/wiki/Rembrandt_lighting#/media/File:Rembrandt_lighting.png (accessed 7 October 2019)


Tuesday, October 1, 2019

Camera and Lighting - Frame rate research


Frame rate is the speed at which those images are shown, or how fast you “flip” through the book and it’s usually expressed as “frames per second,” or FPS. Each image represents a frame, so if a video is captured and played back at 24fps, that means each second of video shows 24 distinct still images.

The speed at which they’re shown tricks your brain into perceiving smooth motion.
Why does frame rate matter?

Frame rate greatly impacts the style and viewing experience of a video. Different frame rates yield different viewing experiences, and choosing a frame rate often means choosing between things such as how realistic you want your video to look, or whether or not you plan to use techniques such as slow motion or motion blur effects.

For example, movies are usually displayed at 24fps, since this frame rate is similar to how we see the world, and creates a very cinematic look. Video that’s broadcast live or video with a lot of motion, such as a sporting event or video game recording, will often have a higher frame rate, as there’s a lot happening at once and a higher frame rate keeps the motion smooth and the details crisp.

On the other hand, people who create animated GIFs will often sacrifice detail for a smaller file size and choose a low frame rate.


Frame rate doesn't effect the amount of light the camera receives however it works in conjunction with the shutter speed to create a smooth image.

Bibliography : Brunner D(2019) Frame Rate: A Beginners Guide Available at: https://www.techsmith.com/blog/frame-rate-beginners-guide/ (Accessed 1 October 2019)
Gif available at: https://www.techsmith.com/blog/frame-rate-beginners-guide/ (Accessed 1 October 2019)

Thursday, September 26, 2019

Camera and Lighting - ISO Night shoot task


high iso 3200, outdoor lights


high iso 3200, outdoor lights


low iso 100, no external lights


high iso 3200, no external light

Thursday, September 19, 2019

Camera and Lighting - Shutter speed research


Shutter speed isn’t particularly difficult; it is just the amount of time your camera spends taking a picture. This could be 1/100 of a second, or 1/10 of a second, or three seconds, or five minutes. Some people build custom cameras that take decades to capture a single photo.

Your camera won’t let you take a decades-long photo. Instead, the longest allowable shutter speed tends to be around 30 seconds, although it does depend upon your camera. For example, on the Nikon D850, you can shoot any shutter speed from 1/8000 second to 30 seconds, as well as a time mode for even longer exposures. Other cameras generally allow similar settings.

So, why does shutter speed really matter? There are two main reasons:

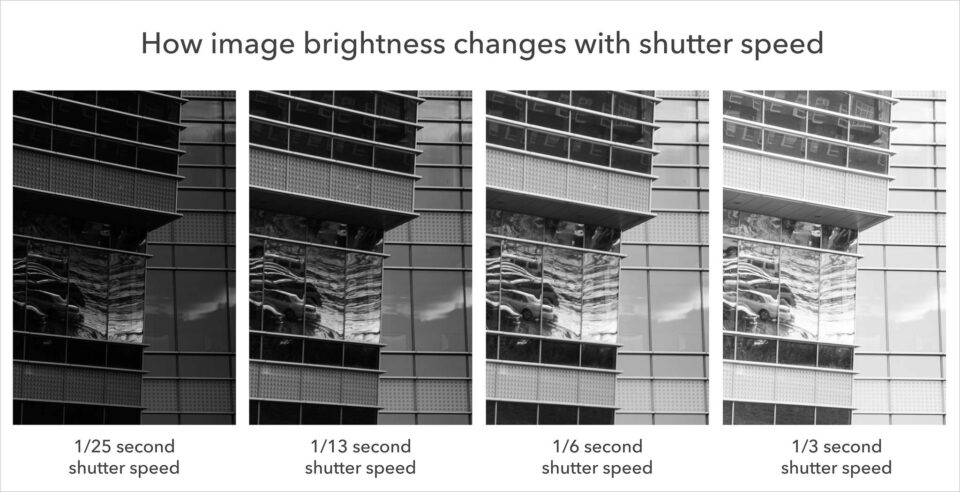
First, as you would expect, a long shutter speed (several seconds) lets in a large amount of light. If you take a normal daytime photo with a 30-second shutter speed, you will capture an image that is completely white. The opposite is true, too; a quick shutter speed only lets in a small amount of light. If you take a photo at night with a 1/8000-second shutter speed, the photo will be completely black.Image brightness changing with shutter speed


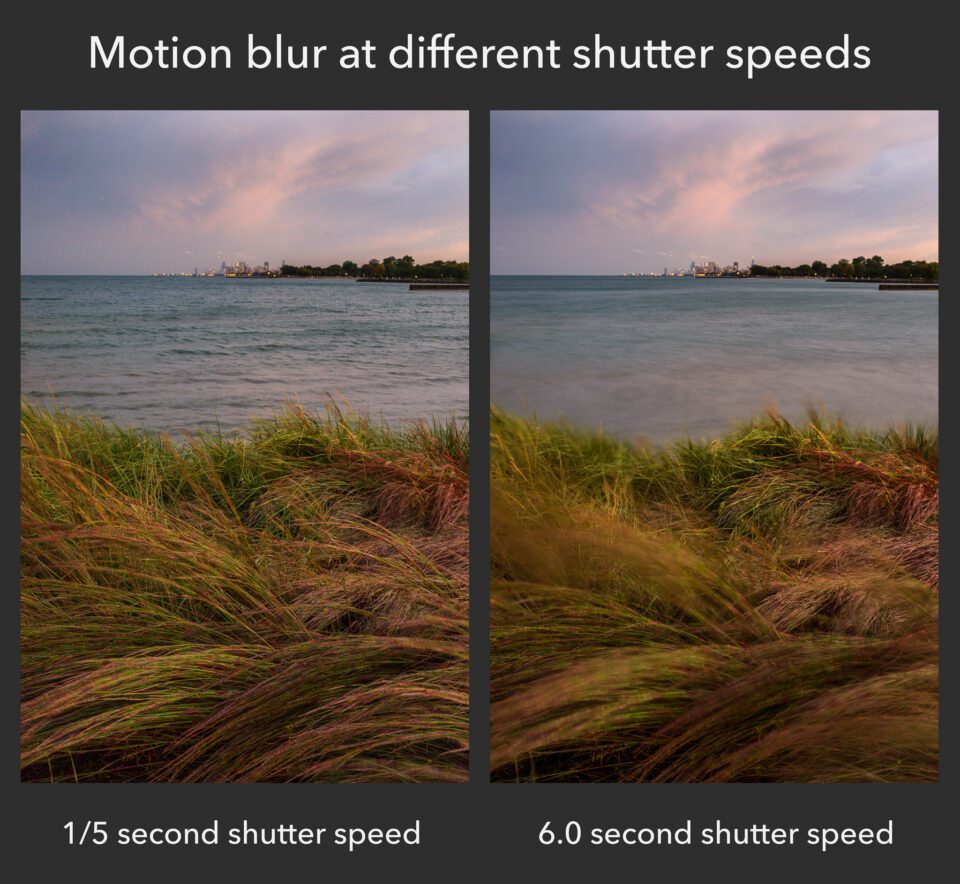
Second, the only other big effect is the motion blur in your images. Not surprisingly, a long shutter speed (such as five seconds) captures anything that moves during the exposure. If a person walks by, they might appear as a featureless streak across the image, since they aren’t in one place long enough for the long exposure to capture them sharply. That’s called motion blur.

By comparison, a quick shutter speed (such as 1/1000 second) does a much better job freezing motion in your photo — even something moving quickly. You can photograph a waterfall at 1/1000 second and see individual droplets frozen in midair. Without a camera, they might have been invisible.
Motion blur comparison

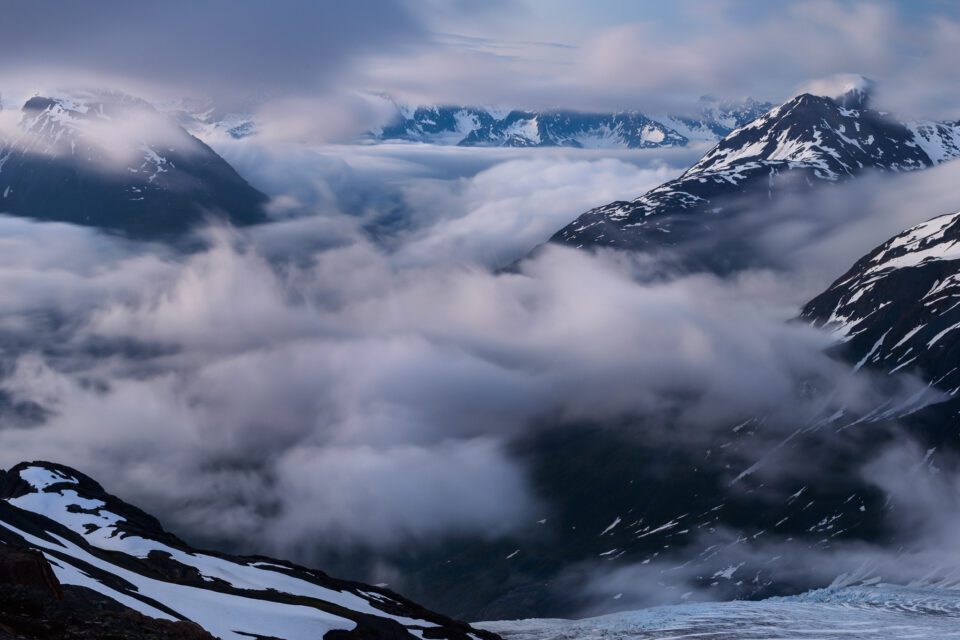
Sometimes, you can use camera or subject blur artistically, and it looks good. For example, if you’re photographing clouds as they pass through a valley, a long shutter speed might be a nice touch:
Long shutter speed blurry clouds


However, in many cases, you probably will want to eliminate motion blur so that your entire photo is sharp. If that’s your goal, you need to pick a shutter speed that is quick enough to freeze any movement. So, what shutter speed should you use? Is there a good range that tends to provide sharp photos of moving subject?

Not really, because it all depends upon some outside factors – most importantly, the amount of movement in your scene. If your subject is moving very quickly, you’ll need a fast shutter speed. If your subject is standing still, or only moving very slowly, you can get away with a longer shutter speed.
Also, the farther you zoom in (i.e., the longer your “focal length”), the more you’ll magnify motion blur. So, you’ll find that you generally need quicker shutter speeds to freeze motion properly when you’re using something like a telephoto lens.

The best route to learn all of this is just to keep practicing. Over time, you’ll build a good mental picture of the shutter speeds you can use in a particular environment without risking motion blur. Whether that’s 1/250 second, 1/10 second, or 20 seconds, it’ll be second nature. Also, after you’ve taken a picture in the field, review it and see if there is any blur when you zoom in. If so, you’ll need a quicker shutter speed.

Want a quick-and-dirty guideline? Use 1/500 second or faster for sports and wildlife action. Use 1/100 second or faster for telephoto portrait images. Use 1/50 second or faster for wider-angle portrait or travel photos where your subject isn’t moving too much. If your subject is completely still, and you have a tripod, use any shutter speed you want.

These are very general suggestions, but they are a good place to start. However, your goal should be to outgrow these tips and develop your own mental model instead. Shutter speed is one of the most intuitive aspects of exposure, and a bit of practice will be enough to help your photographs improve significantly.

Bibliography : Cox.S (2017) What is exposure ( A Beginners Guide) Available at: https://photographylife.com/what-is-exposure (Accessed 19 September 2019)
Images available at: https://photographylife.com/what-is-exposure (Accessed 19 September 2019)

Camera and Lighting - Exposure research


In photography, exposure is the amount of light which reaches your camera sensor or film. It is a crucial part of how bright or dark your pictures appear.

There are only two camera settings that affect the actual “luminous exposure” of an image:shutter speed and aperture. The third setting, camera ISO, also affects the brightness of your photos, and it is equally important to understand. Also, you can brighten or darken a photo by editing it in post-processing software like Photoshop on your computer.

It sounds basic, but exposure is a topic which confuses even advanced photographers. The reason is simple: For every scene, a wide range of shutter speed, aperture, and ISO settings will result in a photo of the proper brightness. You haven’t “mastered exposure” once you can take a photo that’s the right brightness. Even your camera’s Auto mode will do that most of the time. Instead, getting the proper exposure for a photo is about balancing those three settings so the rest of the photo looks good, from depth of field to sharpness.


In this video exposure is described simply as the amount of light you think your subject needs.

The exposure triangle is a common way of associating the three variables that determine the exposure of a photograph: aperture, shutter speed, and ISO. One must balance all three of these to achieve a desired result, an adjustment of one requiring adjustments of at least one of the others. They do not only affect exposure, but are also the largest determiners of the global appearance of an image; thus, their mastery is absolutely crucial both for technique and composition.


The ISO refers to how sensitive your camera is to light; the higher it is, the brighter your photo looks and the more noise or grain it gets. The aperture is the size of the opening of your lens; the lower the number, the bigger the opening is, and the more light your camera takes in and the shallower the depth of field. The shutter speed refers to how long the camera shutter is open when taking a photo; faster speed means less blur.Each of these components can be adjusted to compensate for the settings of the other. As in the example in the video, you ideally want to keep the ISO at 100 for minimal grain or noise. What you adjust is the aperture and shutter speed to control how much light comes in, minimize blur, and get the right depth of field for what you’re shooting.


Bibliography - 
Cox.S (2017) What is Exposure ( A Beginners Guide). Found at : https://photographylife.com/what-is-exposure (accessed 19 September 2019)
The phoblographer (2019)  Get the Hang of the Exposure Triangle With This Tutorial. Found at: https://www.thephoblographer.com/2019/01/09/exposure-triangle-tutorial/ (accessed 24 september     2019)

Video found at: https://www.youtube.com/watch?v=OrQ0tO7rzpk (Accessed: 19 September 2019)
Video 2 found at: https://www.youtube.com/watch?v=fCAcSbObbE0&feature=youtu.be (accessed:                                24 September 2019)
Image found :https://www.thephoblographer.com/2019/01/09/exposure-triangle-tutorial/ (accessed 23                       september 2019)

Camera and Lighting - Pull focus test footage

outdoor - 1 


outdoor 2


indoor

with these clips we were learning about pulling focus between two objects, making different things the centre of focus, a technique cinematographers use when the want to make a subject in a scene the centre of focus for that moment. in the clips I have two example one in low light conditions and 2 in natural light so I changed the iso settings dependent on the location to make the image clear, I shot at 24fps with the shutter speed at 1/50 and dependent on the location the iso at 100, 400 or 800.

Camera and Lighting - Shutter speed test footage

1/250 - shooting at a higher shutter speed slows the image to be clearer as seen in the background the still image looks clear and the moving image the same but when stopped each frame looks like a still image photograph, so higher shuterrspeed give a crisper image however the human eye is conditioned to 1/50 so seeing the higher rate looks judders and weird to us.


1/50 - is what most films are shot at, the background image is clear again however the frame shot looks a little more blurred, this is what the eye is conditioned to see when watching films due to the majority of films bing shot like this.


1/30
the image is blurry when moving and can't be recognised clearly, however a still background image is clear.

Wednesday, September 18, 2019

Camera and lighting - ISO test footage

Low Iso 100
With a higher iso we found that the image had a lot more noise than that shot at a lower iso, with this short video to showing the difference between the iso during daytime, its better to shoot with a higher iso outdoors than indoors, the only issue with shooting outdoors with iso is keeping an eye on the light levels or the footage becomes over exposed, too low and its under exposed.
above is an example of an outdoor shoot during the day with iso set low at 100 and below is an example of shooting indoors an a low light situation so a higher iso is needed.
High iso 3200

Tuesday, September 17, 2019

Camera and Lighting - ISO Research

ISO


In very basic terms, ISO is simply a camera setting that will brighten or darken a photo. As you increase your ISO number, your photos will grow progressively brighter. For that reason, ISO can help you capture images in darker environments, or be more flexible about your aperture and shutter speed settings.

However, raising your ISO has consequences. A photo taken at too high of an ISO will show a lot of grain, also known as noise, and might not be usable. So, brightening a photo via ISO is always a trade-off. You should only raise your ISO when you are unable to brighten the photo via shutter speed or aperture instead (for example, if using a longer shutter speed would cause your subject to be blurry).


Bibliography:
Apalapse (2017) Camera basics - ISO. Available at https://www.youtube.com/watch?v=q8cj9Lj9w-g (accessed: 17 September 2019)
 Mansurov.N (2010) What is ISO. Available at https://photographylife.com/what-is-iso-in-photography (Accessed: 17 September 2019)

Images.
Right - found at https://www.digitaltrends.com/photography/what-is-iso/ (accessed 17 September 2019)
Left -  found at https://www.picturecorrect.com/tips/what-is-the-iso-camera-setting-and-how-to-use-it/ (accessed 17 september 2019)


Monday, September 16, 2019

Camera and Lighting - How and Why lighting affects camera techniques for moving image

Lighting is important in video and film production because cameras do not respond to lights in the same way that the human eye does. The finite detail and lighting contrasts a human eye can see are incredibly developed, and cameras cannot process or pick up on this as well. Additional lighting is necessary to make the definition of a video or film’s definition of a comparable quality to what the human eye sees naturally. The correct lighting can determine the mood of the scene and can evoke a more dramatic or subtle palette for the film. If you are perhaps new to video and film production, the first learning curve is understanding why lighting within production is so key. Regardless of content, any video created, filmed, shared and watched will have had an element of thought and design behind the lighting. The more advanced the video and film production, the more advanced the lighting behind it.


This video essay I found on Film Lighting Tutorials states that there are 2 main types of lighting soft light and Hard light, using either of the two can drastically change the mood of the scene and the shape of a subject. With hard light it gives shadows a definitive or 'hard' edge. And is created by a single source of light
whereas a Soft light is created by a broad light source or by using a diffuser on multiple or single hard light sources and gives a soft shadow effect.


Bibliography:
Marine, J. (2013) Basic lighting lesson: Understanding hard light and soft light. Available at: http://nofilmschool.com/2013/03/basic-lighting-lesson-hard-soft-light (Accessed: 16 September 2019).
In-line Citation:(Marine, 2013)
Video -
Zacuto (2013) Film Lighting Tutorial: Qualities of Light . Available at : https://vimeo.com/57890592 (accessed:16 September 2019)(http://digicult.it/digimag/importance-lighting-video-film-production/)
IMAGES - screens hotted from video above.

Monday, September 9, 2019

Camera and Lighting - Appature research

What is aperture in photography?

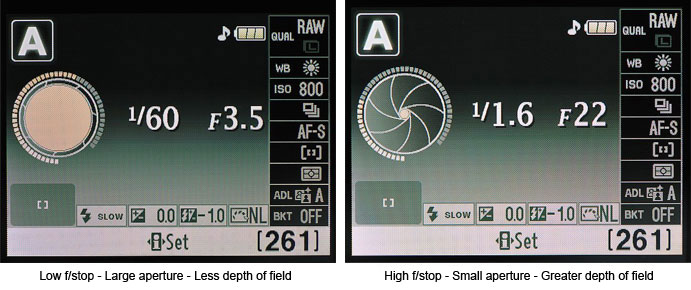
Aperture refers to the opening of a lens's diaphragm through which light passes. It is calibrated in f/stops and is generally written as numbers such as 1.4, 2, 2.8, 4, 5.6, 8, 11 and 16. Lower f/stops give more exposure because they represent the larger apertures, while the higher f/stops give less exposure because they represent smaller apertures. This may seem a little contradictory at first but will become clearer as you take pictures at varying f/stops. Be sure to check your manual first to learn how to set Aperture Priority for your camera, then try experimenting to get comfortable with changing the aperture and recognizing the effects different apertures will have on the end-result image.

How Aperture Affects Depth of Field

Depth of field is the zone of acceptable sharpness in front of and behind the subject on which the lens is focused. Simply put: how sharp or blurry is the area behind your subject. 
The lower the f/stop—the larger the opening in the lens—the less depth of field—the blurrier the background.
The higher the f/stop—the smaller the opening in the lens—the greater the depth of field—the sharper the background.

How Aperture Affects Shutter Speed

Using a low f/stop means more light is entering the lens and therefore the shutter doesn't need to stay open as long to make a correct exposure which translates into a faster shutter speed. Again, the reverse is true: using a high f/stop means that less light is entering the lens and therefore the shutter will need to stay open a little longer which translates into a slower shutter speed.

Saturday, September 7, 2019

Camera and Lighting - Lighting Equipment and setups- Scenarios


For a nighttime shoot the best way to achieve the best possible image isn't through using lighting equipment but can be effectively done through these things.
  • use a lens with a lower f stop.
  • adjusting the ISO - Smaller sensor DLSR's 1600 ISO, Larger sensor DLSR's up to 3200 ISO
  • and at a push adjusting the shutter speed, but this should be a last resort
Going back to equipment if its a time lapse shot tor similar shot where the camera needs to be steady the obvious equipment to use would be a tripod lighting wise ...
  • Natural lighting (cities) and ring lights.
I would choose this equipment for a night time shoot as the ring lights will help keep what's in front of the camera stay well light in dark areas whilst also keeping the "night time feel". I would also use natural lighting from the cities as unless you're walking around into unlit areas at night the exposure levels and lighting would stay fairly consistent throughout the shoot.

For a small documentary where portability is paramount
  • a DSLR viewfinder
  • a digital audio recorder
  • shotgun microphone
  • shoulder mount or gimble
  • Sun light,
  • ring light attached to the camera,
  • small box lights
All of this equipment is small and light making it easy to carry around as you move. The ring light attached to the camera will help keep areas in front of the camera well lit and the small box lights will help light up more shaded areas the the sun can't reach. The only issue with the sun on a bright day is as you move from shade into sun light it can make keeping the light exposure levels consistent and can cause people on screen to squint. to help resolve this, you could either keep to shaded areas, have the people on camera face side on from the sun so they don't squint or plan ahead and shoot on a cloudy day or when the sun is at a high point in the sky which would keep the lighting consistent and away from eyes.

For a talking head interview
  • Full studio soft box lighting kit
  • tripod or stand
  • shotgun microphone depending on how close camera is
This lighting is what is used in the majority of head style interviews as the subject usually stays in the same spot. This will mean you wouldn't have to move heavy equipment around and the lighting and exposure levels would stay consistent throughout the shoot.

Bibliography -
Images -
RINGLIGHT - available at: https://www.gearbest.com/photography-
accessories/pp_009457448275.html (accessed 23rd October 2019)
SHOTGUN MIC - available at: https://www.sweetwater.com/store/detail/VideoMic--rode-videomic-camera-mount-shotgun-microphone-with-rycote-lyre-shock-mounting (accessed 23rd October 2019)


Friday, September 6, 2019

Contextual Studies - EASY RIDER analysis


In this particular moment of the film Wyatt and Billy are sitting in a graveyard with two girls, drinking, smoking and taking acid, a drug common in the 60's, from what is seen in these two minutes they are having a bad trip. further reading of the film as a whole shows that after this bad trip in the graveyard the two lads go on a journey of spiritual truth, the start of which can be seen and directly related to the underlying religious setting of a graveyard but also the use of a non-diegetic but then digetic voice over from a girl reading either from a bible or one of the lords prayers. at the start of the clip we get a mid shot low down looking at the four sat in front of a tombstone on of the lads is dressed as a native american, again pointing the the spiritual trip they will take later in the film. the lack of dialogue between the group doesn't help to show anything that is going on other than the words ''just shut up and take it'' the only speech here that conveys anything is the voice over that comes in a minute into the clip, throughout the scene there is a loud non-diegetic sound that seems like drums banging or something loud and ominous probably foreshadowing the nature of the trip they are about top take from the actual drugs themselves, ironically before they take a trip across america to find spiritual truth. the shot then jumps between a shot of them and a pan upwards of the tomb as well as a lens flare across the screen possibly showing this idea of spirituality as god is the light, this is also seen with the a shot of the sun then going to a white out to the jump back to their bad trip.
Even with the lack of dialogue you can tell what is happening in this moment and is conveyed through shots weather it gives a preferred reading is debatable, I would say that personally I took a negotiated reading to the text as without actively watching it i struggled to understand the ongoing of the clip.
''Cinema in the 1960s reflected the decade of fun, fashion, rock 'n' roll, tremendous social changes (i.e., the civil rights era and marches) and transitional cultural values.''

This can be seen with the drugs mainly as acid was a very popular drug in the 60's/70's however the camerawork is also reflective of the era as the cameras then were still on the bulky side and were not as handheld as cameras today, also reflection the changing times of the era.

Bibliography
Clip available at: https://www.youtube.com/watch?v=SDAdzb9IeGU (Accessed 6th September 2019)