Thursday, September 26, 2019

Camera and Lighting - ISO Night shoot task


high iso 3200, outdoor lights


high iso 3200, outdoor lights


low iso 100, no external lights


high iso 3200, no external light

Thursday, September 19, 2019

Camera and Lighting - Shutter speed research


Shutter speed isn’t particularly difficult; it is just the amount of time your camera spends taking a picture. This could be 1/100 of a second, or 1/10 of a second, or three seconds, or five minutes. Some people build custom cameras that take decades to capture a single photo.

Your camera won’t let you take a decades-long photo. Instead, the longest allowable shutter speed tends to be around 30 seconds, although it does depend upon your camera. For example, on the Nikon D850, you can shoot any shutter speed from 1/8000 second to 30 seconds, as well as a time mode for even longer exposures. Other cameras generally allow similar settings.

So, why does shutter speed really matter? There are two main reasons:

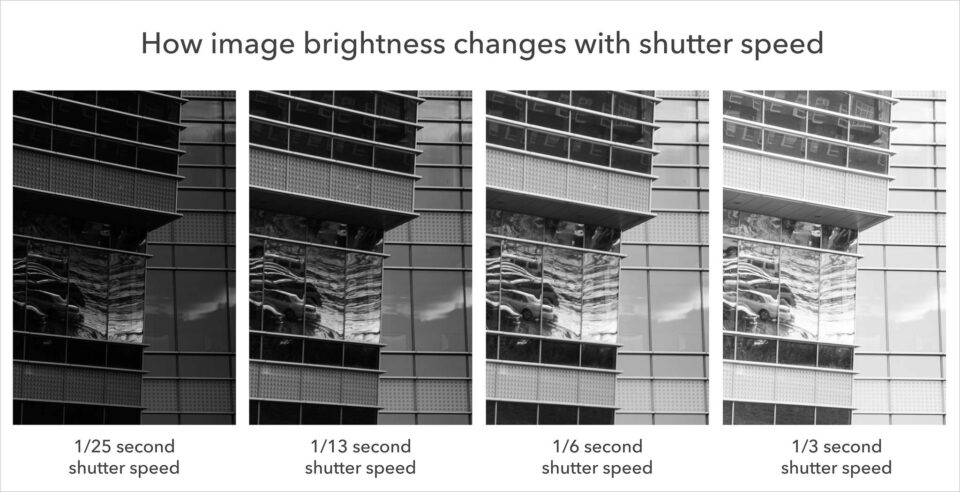
First, as you would expect, a long shutter speed (several seconds) lets in a large amount of light. If you take a normal daytime photo with a 30-second shutter speed, you will capture an image that is completely white. The opposite is true, too; a quick shutter speed only lets in a small amount of light. If you take a photo at night with a 1/8000-second shutter speed, the photo will be completely black.Image brightness changing with shutter speed


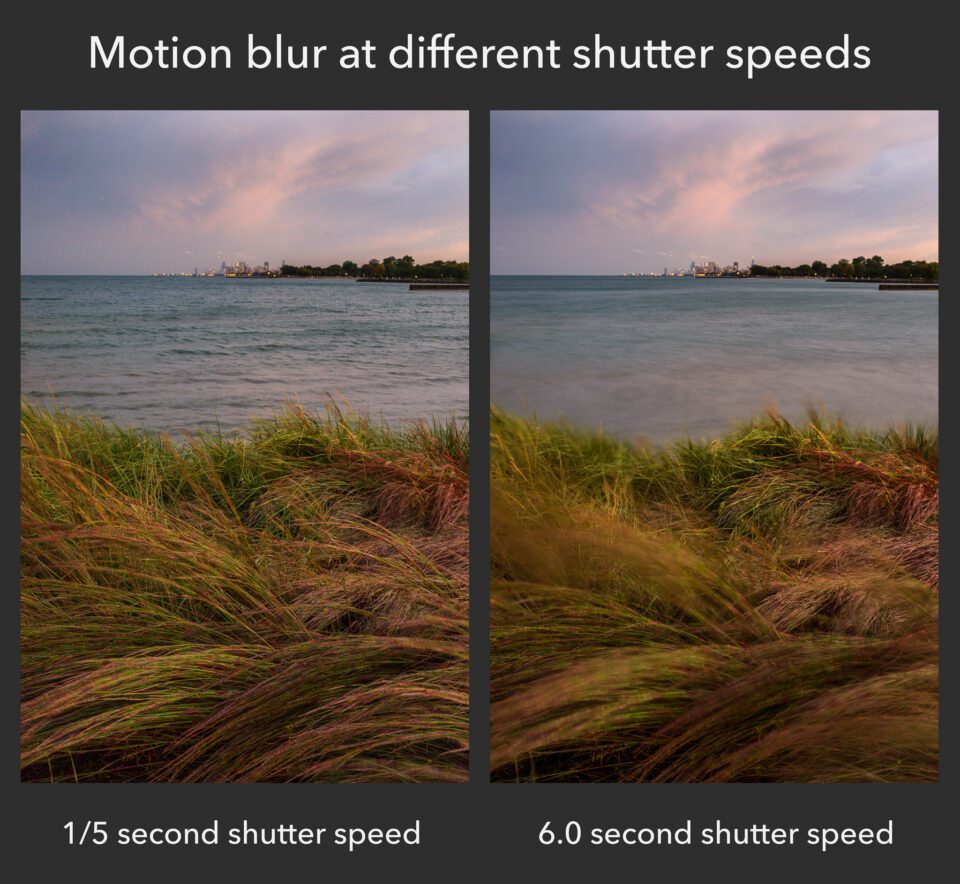
Second, the only other big effect is the motion blur in your images. Not surprisingly, a long shutter speed (such as five seconds) captures anything that moves during the exposure. If a person walks by, they might appear as a featureless streak across the image, since they aren’t in one place long enough for the long exposure to capture them sharply. That’s called motion blur.

By comparison, a quick shutter speed (such as 1/1000 second) does a much better job freezing motion in your photo — even something moving quickly. You can photograph a waterfall at 1/1000 second and see individual droplets frozen in midair. Without a camera, they might have been invisible.
Motion blur comparison

Sometimes, you can use camera or subject blur artistically, and it looks good. For example, if you’re photographing clouds as they pass through a valley, a long shutter speed might be a nice touch:
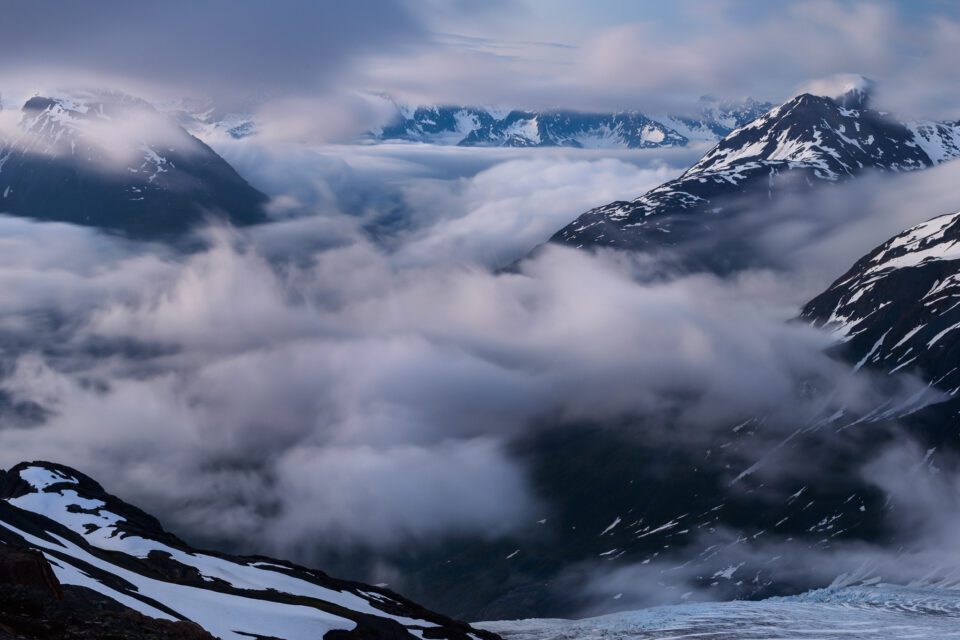
Long shutter speed blurry clouds


However, in many cases, you probably will want to eliminate motion blur so that your entire photo is sharp. If that’s your goal, you need to pick a shutter speed that is quick enough to freeze any movement. So, what shutter speed should you use? Is there a good range that tends to provide sharp photos of moving subject?

Not really, because it all depends upon some outside factors – most importantly, the amount of movement in your scene. If your subject is moving very quickly, you’ll need a fast shutter speed. If your subject is standing still, or only moving very slowly, you can get away with a longer shutter speed.
Also, the farther you zoom in (i.e., the longer your “focal length”), the more you’ll magnify motion blur. So, you’ll find that you generally need quicker shutter speeds to freeze motion properly when you’re using something like a telephoto lens.

The best route to learn all of this is just to keep practicing. Over time, you’ll build a good mental picture of the shutter speeds you can use in a particular environment without risking motion blur. Whether that’s 1/250 second, 1/10 second, or 20 seconds, it’ll be second nature. Also, after you’ve taken a picture in the field, review it and see if there is any blur when you zoom in. If so, you’ll need a quicker shutter speed.

Want a quick-and-dirty guideline? Use 1/500 second or faster for sports and wildlife action. Use 1/100 second or faster for telephoto portrait images. Use 1/50 second or faster for wider-angle portrait or travel photos where your subject isn’t moving too much. If your subject is completely still, and you have a tripod, use any shutter speed you want.

These are very general suggestions, but they are a good place to start. However, your goal should be to outgrow these tips and develop your own mental model instead. Shutter speed is one of the most intuitive aspects of exposure, and a bit of practice will be enough to help your photographs improve significantly.

Bibliography : Cox.S (2017) What is exposure ( A Beginners Guide) Available at: https://photographylife.com/what-is-exposure (Accessed 19 September 2019)
Images available at: https://photographylife.com/what-is-exposure (Accessed 19 September 2019)
Camera and Lighting - Exposure research


In photography, exposure is the amount of light which reaches your camera sensor or film. It is a crucial part of how bright or dark your pictures appear.

There are only two camera settings that affect the actual “luminous exposure” of an image:shutter speed and aperture. The third setting, camera ISO, also affects the brightness of your photos, and it is equally important to understand. Also, you can brighten or darken a photo by editing it in post-processing software like Photoshop on your computer.

It sounds basic, but exposure is a topic which confuses even advanced photographers. The reason is simple: For every scene, a wide range of shutter speed, aperture, and ISO settings will result in a photo of the proper brightness. You haven’t “mastered exposure” once you can take a photo that’s the right brightness. Even your camera’s Auto mode will do that most of the time. Instead, getting the proper exposure for a photo is about balancing those three settings so the rest of the photo looks good, from depth of field to sharpness.


In this video exposure is described simply as the amount of light you think your subject needs.

The exposure triangle is a common way of associating the three variables that determine the exposure of a photograph: aperture, shutter speed, and ISO. One must balance all three of these to achieve a desired result, an adjustment of one requiring adjustments of at least one of the others. They do not only affect exposure, but are also the largest determiners of the global appearance of an image; thus, their mastery is absolutely crucial both for technique and composition.


The ISO refers to how sensitive your camera is to light; the higher it is, the brighter your photo looks and the more noise or grain it gets. The aperture is the size of the opening of your lens; the lower the number, the bigger the opening is, and the more light your camera takes in and the shallower the depth of field. The shutter speed refers to how long the camera shutter is open when taking a photo; faster speed means less blur.Each of these components can be adjusted to compensate for the settings of the other. As in the example in the video, you ideally want to keep the ISO at 100 for minimal grain or noise. What you adjust is the aperture and shutter speed to control how much light comes in, minimize blur, and get the right depth of field for what you’re shooting.


Bibliography - 
Cox.S (2017) What is Exposure ( A Beginners Guide). Found at : https://photographylife.com/what-is-exposure (accessed 19 September 2019)
The phoblographer (2019)  Get the Hang of the Exposure Triangle With This Tutorial. Found at: https://www.thephoblographer.com/2019/01/09/exposure-triangle-tutorial/ (accessed 24 september     2019)

Video found at: https://www.youtube.com/watch?v=OrQ0tO7rzpk (Accessed: 19 September 2019)
Video 2 found at: https://www.youtube.com/watch?v=fCAcSbObbE0&feature=youtu.be (accessed:                                24 September 2019)
Image found :https://www.thephoblographer.com/2019/01/09/exposure-triangle-tutorial/ (accessed 23                       september 2019)

Camera and Lighting - Pull focus test footage

outdoor - 1 


outdoor 2


indoor

with these clips we were learning about pulling focus between two objects, making different things the centre of focus, a technique cinematographers use when the want to make a subject in a scene the centre of focus for that moment. in the clips I have two example one in low light conditions and 2 in natural light so I changed the iso settings dependent on the location to make the image clear, I shot at 24fps with the shutter speed at 1/50 and dependent on the location the iso at 100, 400 or 800.

Camera and Lighting - Shutter speed test footage

1/250 - shooting at a higher shutter speed slows the image to be clearer as seen in the background the still image looks clear and the moving image the same but when stopped each frame looks like a still image photograph, so higher shuterrspeed give a crisper image however the human eye is conditioned to 1/50 so seeing the higher rate looks judders and weird to us.


1/50 - is what most films are shot at, the background image is clear again however the frame shot looks a little more blurred, this is what the eye is conditioned to see when watching films due to the majority of films bing shot like this.


1/30
the image is blurry when moving and can't be recognised clearly, however a still background image is clear.

Wednesday, September 18, 2019

Camera and lighting - ISO test footage

Low Iso 100
With a higher iso we found that the image had a lot more noise than that shot at a lower iso, with this short video to showing the difference between the iso during daytime, its better to shoot with a higher iso outdoors than indoors, the only issue with shooting outdoors with iso is keeping an eye on the light levels or the footage becomes over exposed, too low and its under exposed.
above is an example of an outdoor shoot during the day with iso set low at 100 and below is an example of shooting indoors an a low light situation so a higher iso is needed.
High iso 3200

Tuesday, September 17, 2019

Camera and Lighting - ISO Research

ISO


In very basic terms, ISO is simply a camera setting that will brighten or darken a photo. As you increase your ISO number, your photos will grow progressively brighter. For that reason, ISO can help you capture images in darker environments, or be more flexible about your aperture and shutter speed settings.

However, raising your ISO has consequences. A photo taken at too high of an ISO will show a lot of grain, also known as noise, and might not be usable. So, brightening a photo via ISO is always a trade-off. You should only raise your ISO when you are unable to brighten the photo via shutter speed or aperture instead (for example, if using a longer shutter speed would cause your subject to be blurry).


Bibliography:
Apalapse (2017) Camera basics - ISO. Available at https://www.youtube.com/watch?v=q8cj9Lj9w-g (accessed: 17 September 2019)
 Mansurov.N (2010) What is ISO. Available at https://photographylife.com/what-is-iso-in-photography (Accessed: 17 September 2019)

Images.
Right - found at https://www.digitaltrends.com/photography/what-is-iso/ (accessed 17 September 2019)
Left -  found at https://www.picturecorrect.com/tips/what-is-the-iso-camera-setting-and-how-to-use-it/ (accessed 17 september 2019)